Building a Mini-ITX computer for onboard use.
|
||
The Problem: |
||
| When I went looking for a suitable computer for use on the yacht Delicate Balance in the Victoria to Maui race, I initially looked at using an off the shelf 12 volt PC, but a good one was hard to find, and many that were listed on the internet were obsolete technology and used Windows XP. I wanted an up to date system that would have a long lifespan, and I wanted it to run Windows 7. | ||
My Solution: |
||
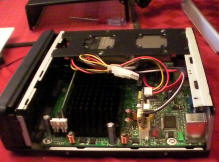
| I bought the parts, and put it together myself. The only
tool used was a small Philips screw driver. The result is a fast
booting, fanless, no moving parts system which runs on 9 to 32 volts DC,
ideal for a boat or other vehicle. We decided to mount it in a dry place
inside the boat and use a remote touch screen in the cockpit. So, it
isn't waterproof, but the case is aluminum and I will spray the innards
with an anti-corrosion coating of some sort. |
||
The Parts: |
||
Here is the list of parts I bought:
|
||
Building the system: |
||
With all the parts laid out it:
|
||
Testing: |
||
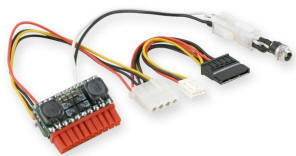
| It should all be ready to go. My power supply came with an AC adapter which I
plugged in. An LED lit up on the motherboard indicating powere was there. I
pressed the power button on the front panel and a blue light came on. I shut it
off and then got ready to install the software. We will be using a touchscreen so no keyboard and mouse, but the screen wasn't here yet so I borrowed a monitor, keyboard, and mouse from another computer and connected them to the back panel.
|
||
Installing Windows 7 |
||
| Now the tricky bit--installing the operating system and other software on a
machine with no CD/DVD drive. The operating system came on a DVD drive. A google
search turned up instructions, and a Microsoft provided tool to make a
bootable USB stick to install the software. I did this on my desktop
computer.
The tool is available here. Instructions for use here. I followed the instructions and it worked fine. |
||
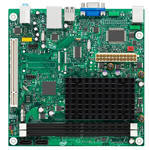
| Then I had to make the BIOS on the computer setup to boot from the USB. To
access the BIOS on most computers you press F2 during bootup. This doesn't work
on this mother board. You switch off the computer, disconnect the power and move
a small jumper on the motherboard, hook up power and restart the computer.
Locate the boot settings and set them for USB devices first. Exit and save.
The Intel Motherboard came with a very clear layout drawing showing the
location of all the connectors and jumpers. |
||
| Power off and move the jumper back to its original location, then put the
Windows 7 USB stick in one of the USB connectors and restart. It should
automatically take you into the standard Windows 7 setup. Once Win 7 is
installed and working, you need to go through the bios setup again to set boot
order to hard drive first. |
||
| I recommend connecting the computer to the internet (there is an RJ-45 Ethernet
jack on the back panel) to get the latest updates. Intel provided a driver disk
with the motherboard but it wasn't needed, Windows 7 had all the drivers. |
||
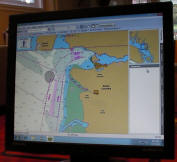
| While connected to the Internet I downloaded the latest
version of Avia Server and Avia Sail from
www.aviadesign.com/NMEA2000
and installed them. I hooked up the computer to our NMEA 2000 test
network via the Actisense NGT-1 and tried it out. It works perfectly,
and is not noticeably slower than my Quad Core desktop machine when
running boating applications. I also installed Coastal Explorer and
VSPE
to allow sharing the GPS data.
You now can install your other software from USB stick. |
||
Buy one ready to go? |
||
| Does this sound like a lot of work? There are quite a lot of steps involved, but
none are very difficult for a handy person. The only tool used was a small
Philips screw driver. If you prefer we will build and test
one for you for $995 US or Canadian, plus shipping. The parts alone will be in
the neighborhood of $600. Email
sales@aviadesign for a detailed quote. |
||
|
|
|
|